Installing Parquet, Chevron & Panel Flooring
You can read the condensed installing parquet, chevron and panel wood flooring excerpt from our full installation guide on this page, or you can download the full installation guide below.
Site Checks
Before commencing installation ensure the requirements have been met for:
- Jobsite Conditions (Chapter 1)
- Moisture Testing (Chapter 2)
- Acclimatisation (Chapter 3)
Acceptable Sub Floors
Parquet can be glued down with MS Flex adhesive (over concrete or solid panel subfloors). Only Ted Todd adhesive should be used. Parquet cannot be installed directly on to solid board subfloors and when over solid board, subflooring requires 9mm or better underlayment panels.
Installation Guidelines
Always check with the homeowner/end user that they are happy with the visual appearance of the floor – open several packs at a time and mix the planks or blocks to ensure the floor is visually well-balanced.
Parquet is recommended for glue down installation using Ted Todd MS Flex. Ted Todd Primer Fast Vapour retarder is necessary unless there is underfloor heating, in this case the Ted Todd Fidbox monitoring system must be used. A minimum expansion space of 15mm must be left around the perimeter and all vertical obstructions.
Parquet Layouts
The Parquet design you choose will affect how you start the installation. To find the centre of the room refer to Appendix F – Trammel Point Method in our full installation guidelines.
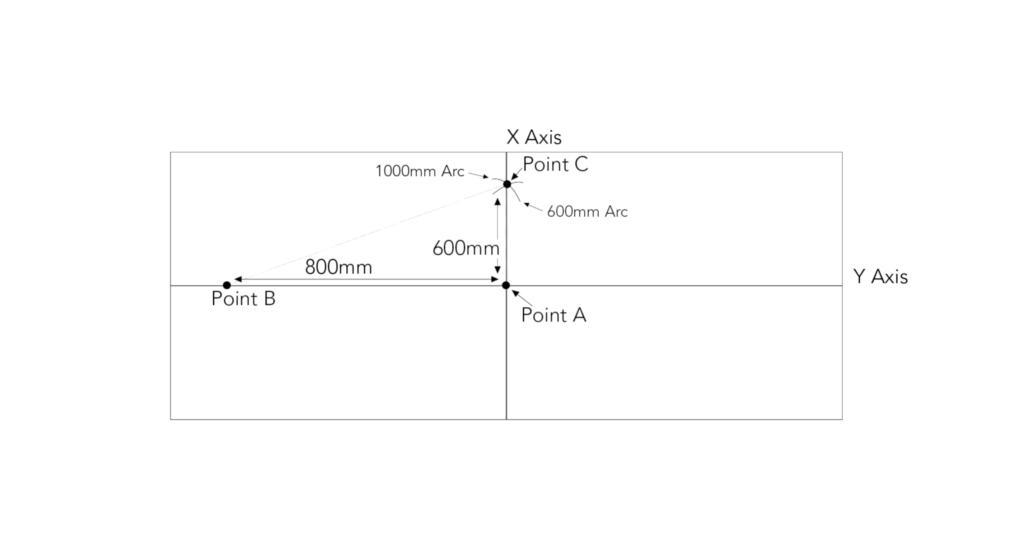
Square Layout from the Centre of the Room
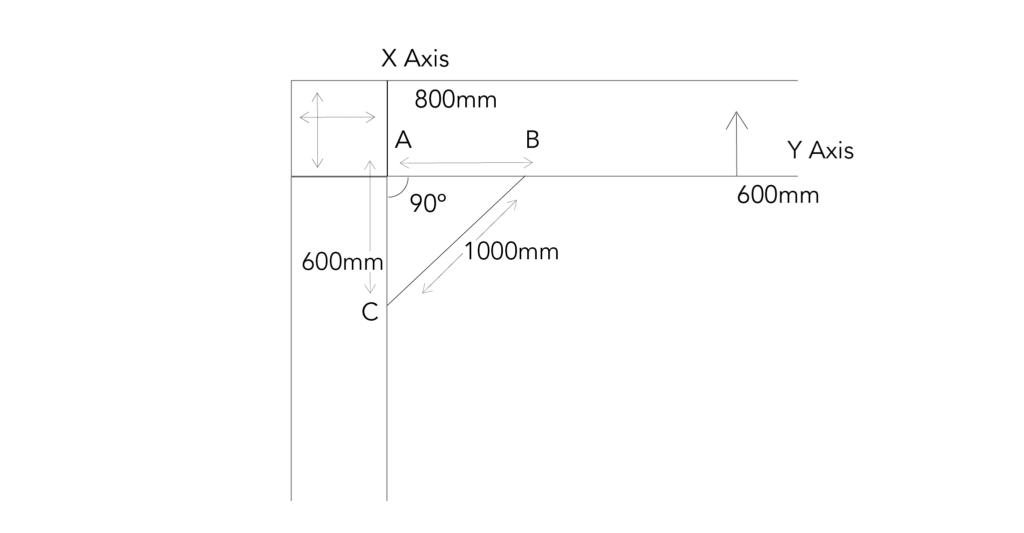
Snap a chalk line through the centre of the room (line Y). The next line (X) must be exactly 90 degrees to line Y to form a square corner.
To ensure this angle, do the following:
From the centre point (A) of line Y, measure 800mm along line Y and mark that point (B); From the same centre point, measure 600mm in the general direction of where line X will be and scribe an arc; Return to the original 800mm mark on line Y and measure 1000mm, scribing an arc that crosses (point C) the 600mm arc you made in the previous step (double check for accuracy by following a similar measurement and arc-scribing process on the other side of line Y and the opposite side from the expected position of line X) Snap a chalk line through the conjunction of the two arcs at point C and the centre point of line Y. This will be line X, at an exact 90-degree angle to line Y.
Fig 5.1
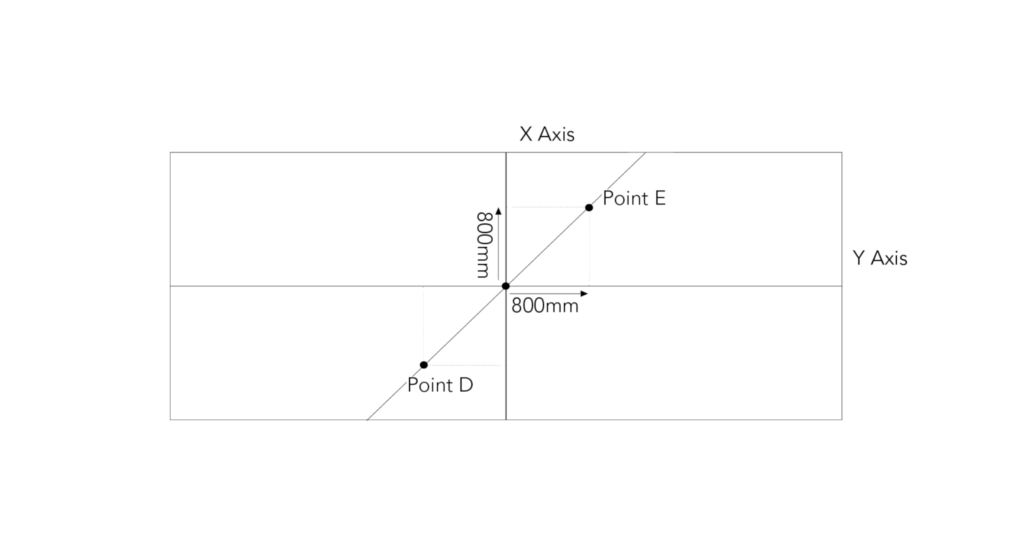
Diagonal Layout from the Centre of the Room
From the centre point, measure 800mm down in each direction on lines X and Y, which you will have already determined by the method described above. From each of these points, measure 800mm and scribe an arc. The conjunction of these arcs creates points D and E. Snap a chalk line between points D and E, and the centre point. This line represents a 45 degree angle.
Fig 5.2
Installation of Herringbone Using Square or Diagonal Layout
Use reference lines shown in figure 5.3.
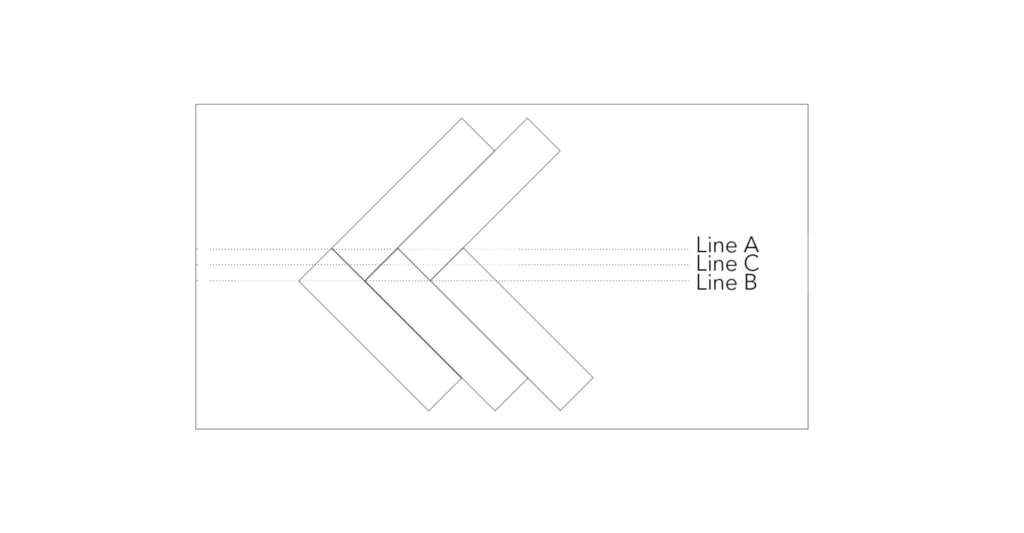
For basket weave and similar patterns the multiple of the width should equal the exact length of the piece. If the width of the product varies, this will cause separations at the end of the herringbone pieces.
This can be laid out parallel or at a 45-degree angle to the room. Regardless of direction, herringbone parquet will require a centreline and two working lines (See Figure 5-3).
Begin by laying out a few alternating slats. Snap lines A & B through the corners of the alternating slats (See Figure 5-3) Measure the distance from Line A to Line B. Line C should be ½ that distance and run parallel to Lines A & B. The centreline of the room and the centre of the pattern is represented by Line C.
Alternative Herringbone Installation Using Square or Diagonal Layout
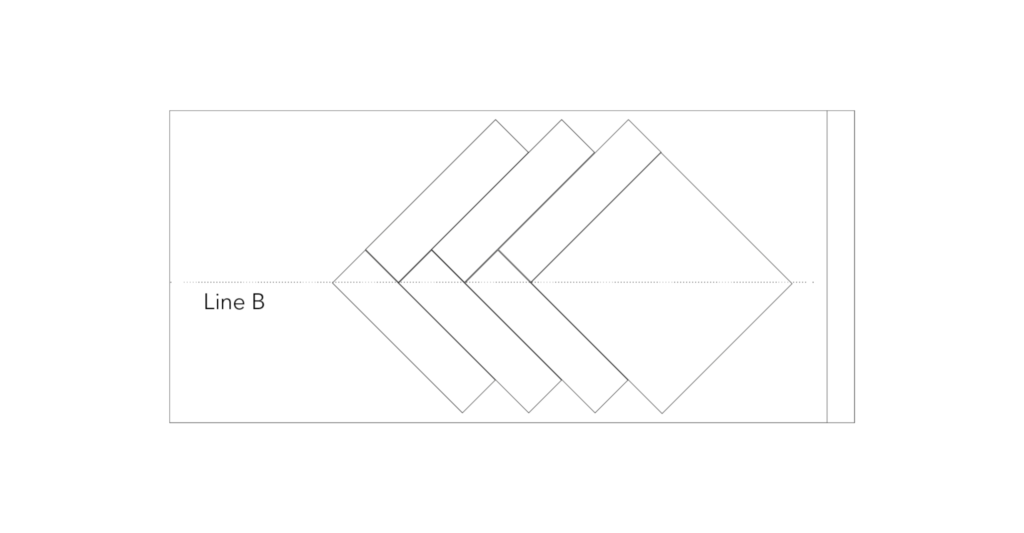
Installation on working Line B (See Figure 5-4).
Cut a square piece of plywood the size of the herringbone pattern. For example, if the herringbone pattern is 70mm by 230mm, cut a 230mm x 230mm square of plywood.
Fasten the piece of plywood at your starting point on Line B, with one corner of the square pointing in the direction of the pattern.
Fig 5.4
Square Layout from the Wall
Panels or basket weave parquet can be laid wall to wall without centring the product in the room.
The results will not be balanced but the products have no edge treatment to delineate the difference in sizes when unbalanced.
More intricate patterns require centring.
If the room dimensions allow, in at least two places from the corner, measure out and establish a chalk line parallel to and the width of 2 panels plus 13mm away from the starting wall opposite the entrance doorway.
Start this by snapping a chalk line and the width of 2 panels plus 13mm from the starting wall, opposite the entrance doorway (Line Y). The next line (X) must be exactly 90° to Line Y to form a perfect square corner.
To ensure this angle:
Measure the width of 2 panels plus 13mm along Line Y from the right-angle wall and mark it Point A.
From Point A, measure 800mm along Line Y and mark that Point B.
From Point A, measure 600mm in the general direction of where line X will be and scribe an arc.
From Point B measure 1000mm, scribing an arc that crosses Point C.
Verify all measurements before proceeding.
If correct, snap a chalk line through Point A and the conjunction of the two arcs at point C.
This will be Line X, at an exact 90° angle to Line Y.
Make any necessary adjustments to allow for walls out of square before proceeding.
Fig 5.5 Creating 90° working lines from the wall
Installation Using Wall Layout
Fig 5.6
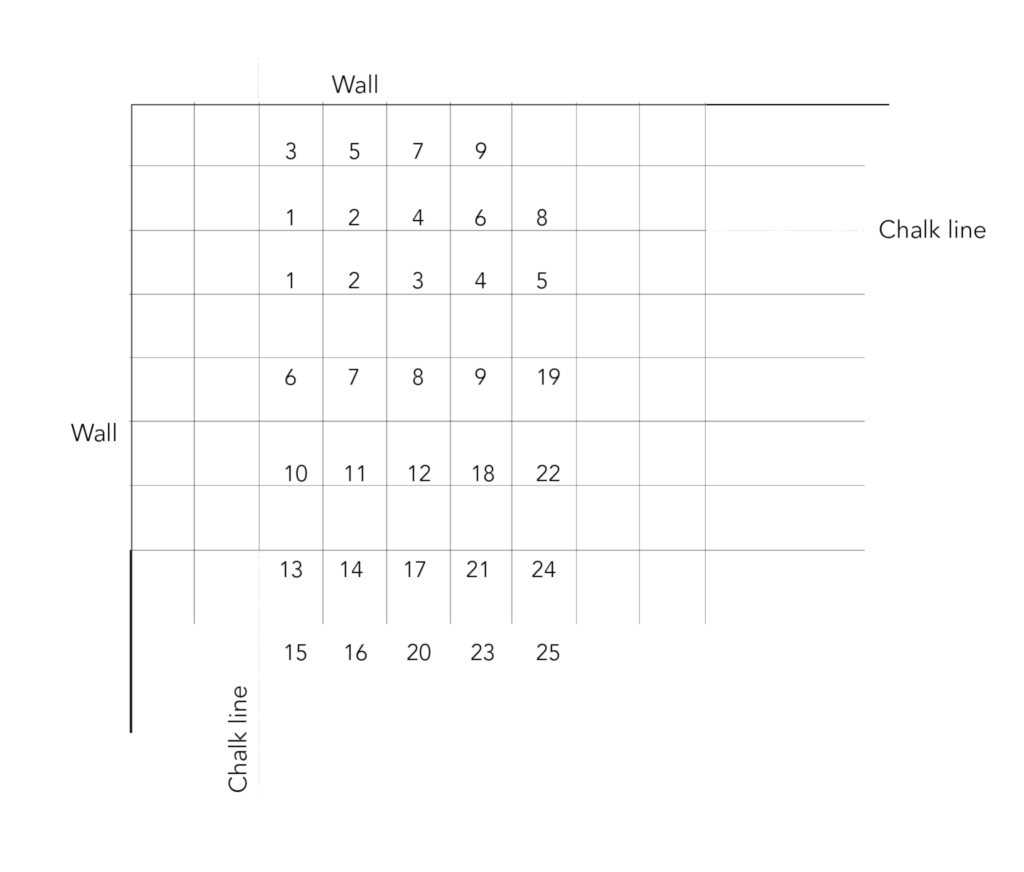
For patterns such as basket weave, the pattern can run out if installed wall to wall without checking for fitting tolerances. To avoid this, it is recommend fitting the blocks in a 5 x 5 pyramid pattern which will allow you to keep a constant check to ensure the pattern is not running out.
The border can be completed along with the main area or left for completion after the main area has cured, when completing this area use a staggered pattern as shown.
After both chalk lines (at 90 degrees to each other) have been snapped, start spreading the Ted Todd MS Flex adhesive in the area to be installed.
Continue spreading the adhesive in the working area. Be careful not to spread adhesive beyond the chalk line.
Immediately lay the product on the newly spread adhesive.
DO NOT lay the floor product on dry adhesive. If the adhesive becomes too dry, scrape up the old adhesive and spread more.
IMPORTANT: Do not stand/ kneel on installation to avoid shifting.
PROPER PLACEMENT OF THE FIRST BLOCK IS THE KEY TO THE ENTIRE INSTALLATION.
Carefully place a parquet block at the intersection of the two chalk lines.
Do not use the edge of the tongue for aligning the block on the chalk lines.
Re-check to be sure the starting blocks are properly lined up with the chalk line. This is to assure a square starting area.
Do not push too strenuously as this as it could cause the first and second floor pieces to move. If this occurs simply realign them and proceed with the installation.
Avoid hammering or forcing the components together as this may destroy the squareness of the product.
Maintain the 15mm expansion space around the perimeter of the room and around all fixed objects.
Allow a minimum of 24 hours drying time before moving furniture or walking on the newly laid parquet floor.
Extra Consideration When Installing Chevron Parquet Flooring:
Installation of chevron style flooring requires a high degree of technical ability and should only be performed by a qualified and experienced professional wood floor installer.
It is not suitable as a DIY project nor suitable for installation by joiners or builders unless they are fully qualified professional wood floor installers.
Please note that to achieve a successful chevron flooring installation requires a very high degree of accuracy during both the manufacture and the installation.
Site conditions must be perfect and fully comply with the guidelines in sections 5.1 Site Conditions, 5.2 Acceptable Subfloors, and 5.3 Installation, which can be found in our full installation guide at the top of this page.
Subfloor flatness is of paramount importance.
Most installation problems can be traced back to an inadequately levelled sub floor.
Chevron will have small gaps in the installation because of natural causes (2mm avg). Check the customer is satisfied with this. If the customer wants improved visual accuracy, install unfinished chevron blocks to be filled and sanded after installation.
Installation considerations
Determine which chevron blocks are ‘left’ or ‘right’ handed – either in the same pack or separated into two.
Determine the layout for the floor and the direction the pattern will run.
Once the subfloor preparation is complete, mark the centre lines or angled lines in accordance with section 5.4.
Precise measurements are essential when laying a chevron pattern.
Verify measurements and check row alignment frequently to ensure the pattern is being laid accurately and evenly.
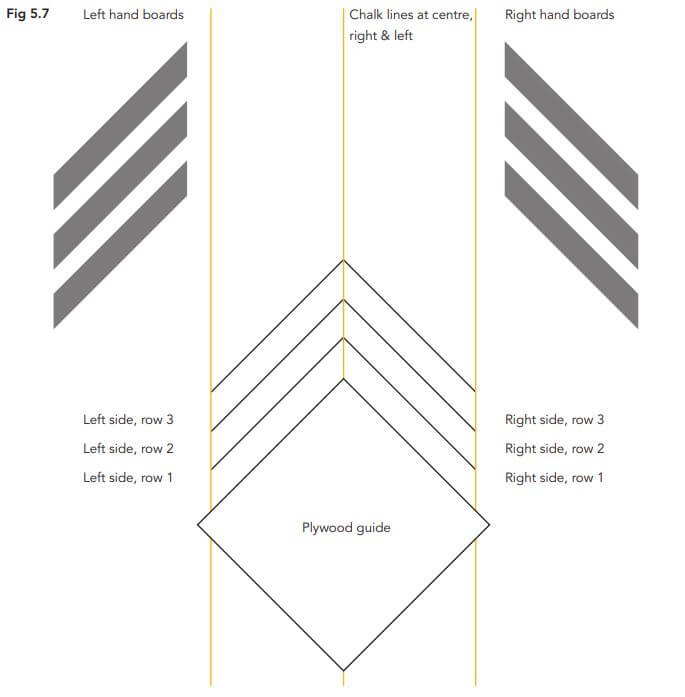
To use as a guide to begin the installation, prepare a perfectly square piece of plywood 500mm x 500mm.
Select your starting area in the middle of the room and affix the plywood guide to the subfloor in a diamond position with the top and bottom points aligned with the centre line. (See diagram 5.7)
Open several packs of the chevron blocks, inspect the boards and loose lay the first section of flooring, both left and right sides. Ensure that the pattern is correct, that the points meet cleanly and that the short lengths make a perfectly straight line following the chalk lines.
Once you are happy that the installation will be acceptable, apply the Ted Todd MS flex adhesive to the subfloor and complete the installation of the first line both left and right sides.
Allow this to dry completely (up to 24 hours) and then use this initial column of glued-down chevrons as a start point for the remaining columns, having accurately marked out the centre, left and right chalk lines for each new column of chevrons.
If the short (header) joints are not already T&G profiled, consider using a loose tongue. That will minimise lipping at the points. Remember to allow for normal expansion joint considerations.
Installation using plywood guide
Fig 5.7
Additional considerations when installing engineered patterned panels such as Versailles, Chantilly, Jerdi etc:
Installation of engineered flooring panels requires a high degree of technical ability and should only be performed by a qualified and experienced professional wood floor installer.
It is not suitable as a DIY project nor suitable for installation by joiners or builders unless they are fully qualified professional wood floor installers. Site conditions must be perfect and fully comply with the guidelines in sections 5.1 Site Conditions, 5.2 Acceptable Subfloors, and 5.3 Installation, which you can find in our full installation guide at the top of this page.
Subfloor flatness is of paramount importance. Most installation problems can be traced back to an inadequately levelled sub floor.
General guidelines: It is recommended that panels be installed fully bonded using Ted Todd MS Flex adhesive, preferably onto a flat plywood subfloor, or onto a specially prepared flooring screed that meets conditions of dryness, flatness and structural integrity. Panels should not be installed in a “floating” method.
Layout:
Before even ordering any panels, please check that the dimensions of the panels are understood, that the dimensions of the room or area to be installed are understood and that the general pattern and layout is agreed with the end client.
It should also be considered that the panels may be best arranged in a pattern diagonal to the room.
This may make edge details around obstructions e.g. fireplaces, or out of square walls easier to deal with.
When planning the installation layout, it is usual to start from the centre of the area to be installed. Consideration will need to be given to the detailing of the outside edges of the room.
It may be better to provide for some “border strips” of plank flooring to complete the edges. If required, do order the border strips at the same time as the panels so that the finish and thickness can complement the panels. Do remember to follow the general recommendations regarding expansion gaps etc.
Tongue and Groove
Panels may be supplied with differing tongue and groove arrangements. Please check below:
(i) Panels may be supplied with 2 tongues and 2 grooves in which case there may be left- and right-handed versions depending upon the pattern. Please check the layout before installing.
(ii) Panels may be supplied with 1 tongue and 3 grooves which should facilitate most pattern arrangements without left- or right-handed versions. Please check the arrangement of the panels before installing. Loose tongues may be used to help the alignment of the panels on those edges where two grooves meet. Glue the loose tongues into the panels using Ted Todd T&G adhesive.
(iii) Panels may be supplied with 4 grooves which should facilitate all pattern arrangements without the need for left- and right-handed panels. In this case the use of loose tongues in all joints is highly recommended to ensure tight alignment between the panels. Glue the loose tongues into the panels using Ted Todd T&G adhesive.
Installation
Do follow the general recommendations for installation of a glue-down floor as well as the specific guidelines mentioned in this section for installing panels. Do always remember to start from the centre of the room or area to be installed and “dry-fit” the panels in the general orientation and gain approval from the end client. Similarly, obtain agreement with the end client that they are happy with the product as delivered, including grade, finish, etc. Please check that dimensions of the panels as supplied are as expected.