Safety Guidelines, Testing & Accessories
You can read the condensed safety guidelines, testing and accessories excerpt from our full installation guide on this page, or you can download the full installation guide below.
APPENDIX A – SAFETY GUIDELINES
Safety first.
Safety on the job is the foremost concern for contractors, because accidents with power tools can be critical, even disabling or deadly. No amount of experience or expertise exempts you from safety risks inherent in using the tools required to install hardwood floors. The good news is that these risks are easily managed.
Start with these general guidelines:
- Never work under the influence of alcohol, drugs or medication
- Work with others nearby, if possible
- Do not work on a cluttered floor
- Use proper lighting and ventilation
- Make sure that the electrical power and wiring at the jobsite is sufficient to operate all machines safely
- Know your insurance company’s policy on coverage related to accidents or jobsite situations
- Wear proper work clothing and shoes. Do not wear loose clothing that could get caught in a machine
- Wear approved hearing protection and safety glasses, as well as dust and fume respirators, knee protection and gloves
- Have an approved first-aid kit on the job site
- Read and fully understand the owner’s manuals that are supplied with the equipment
- Use tools only as intended;
- Use all tool and machine safety guards
- Turn off and unplug electrical tools and machines when making adjustments and attaching accessories
- Turn off all sources of ignition when using flammables
- Use fault circuit breakers on electric tools to avoid electric shock
- Carry and read Material Safety Data Sheets for all products
APPENDIX B – EQUILIBRIUM MOISTURE CONTENT OF WOOD SPECIES AT VARIOUS TEMPERATURES AND RELATIVE HUMIDITY READINGS
Wood flooring has a comfort level too: Wood flooring will perform best when the interior environment is controlled to stay within a relative humidity range of 40% to 60% and a temperature range of 15 to 26 degrees centigrade. Fortunately, that’s about the same comfort range most humans enjoy.
The charts below indicate the equilibrium moisture content of European Oak species of wood under various temperature and humidity conditions.
BS8201 suggests a range of average moisture contents to suit varying conditions:
- Unheated – 15% to 19%
- Intermittent Heating – 10% to 14%
- Continuous Heating – 9% to 11%
- Under floor Heating – 6% to 8%
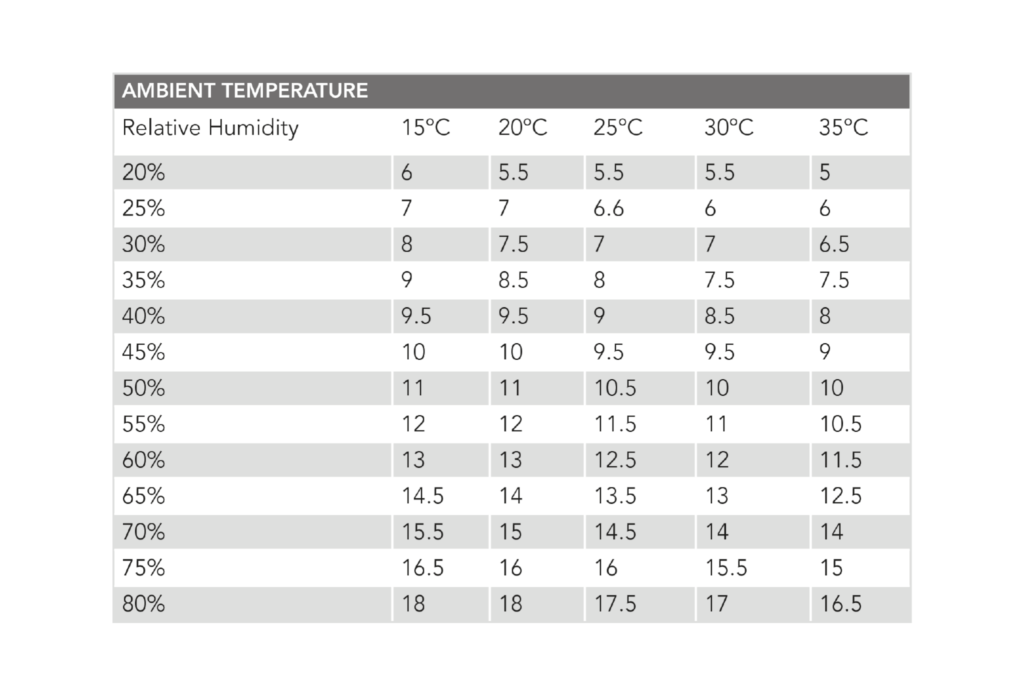
CAPTION: Coefficients of Change: How Moisture Affects Wood Flooring.
At 20°C a relative humidity of 25 % gives an EMC of 7%, and a relative humidity of 75% gives an EMC of 16%. A 50% variance in relative humidity produces an EMC change of 20%.
How that affects wood flooring depends on which species is being used. However, let’s say the width variation is just 1.5mm for a 57mm strip. That’s a full 25mm over 16 strips in a floor. Over the width of a 6m wide floor, that amounts to more than 75mm of total expansion or contraction.
Protective coatings cannot prevent wood from gaining or losing moisture; they merely slow the process. Installers need to take those expected dimensional variations into account when installing the wood flooring.
APPENDIX C – PROPER INSTALLATION BY CALCULATING COEFFICIENTS OF CHANGE.
Proper installation depends not only on the moisture content of the wood and the environmental conditions at the time of installation, but also on expected seasonal changes in temperature and humidity at that location — changes that may cause the wood flooring to gain or lose moisture content over time.
Such changes are likely to occur even if the building occupants maintain interior environmental conditions through use of a heating and/or air-conditioning system.
For example, if a wood flooring installation takes place when relative humidity is high, the wood flooring will lose moisture content and therefore shrink during low-humidity seasons. In that case, install the flooring tightly enough to minimize the expected separations that will occur as the boards shrink during dry seasons.
Conversely, if an installation takes place when humidity conditions are low, it’s likely that the wood flooring will gain moisture and expand during humid seasons. In those cases, incorporate additional expansion space through use of spacers.
How much expansion space to leave will depend on the expected changes in moisture content of the wood flooring, and that will depend on the dimensional change coefficient of the species being installed and the width of the flooring.
Predicting Temperature And Humidity Changes
Installers will generally have a good idea as to the prevailing conditions within their installation areas and these should be taken into account when making any decisions concerning the acclimatisation of the flooring and calculation of the movement in use.
Calculating Dimensional Change
Different species of wood flooring exhibit different coefficients of change and, therefore, have different rates of dimensional stability. That is, some woods are more prone to expansion and shrinkage than others.
The British Wood Flooring Association’s Technical Publication No. A200: Wood Species Used in Wood Flooring lists dimensional change coefficients for many common wood species used in wood flooring.
To calculate the expected dimensional change in wood flooring, you will need to determine the current moisture content of the wood flooring, using a moisture meter. Then calculate the expected change in moisture content, using the equilibrium moisture content chart above and the climate data for the location in which then flooring is to be installed. Finally, you will need to know the dimensional change coefficient of the species to be installed.
With that information in hand, you will be able to perform a simple calculation that will tell how much the wood flooring is likely to expand or shrink. That calculation multiplies the change in moisture content by the change coefficient, multiplied by the width of the floor boards.
Change coefficient x moisture content change x board width = dimensional change
For example, let’s say that climate data for the location indicates that the maximum moisture content for the wood flooring will be 10.5 % (relative humidity of 50% and temperature of 25°C). Let’s also say that the wood flooring currently has a moisture content reading of 7.5%. That means the wood is likely to experience a change in moisture content of 3% (10.5% – 7.5%) from dry season to humid season.
In the example, let’s say that the wood flooring to be installed is 127mm plank red oak. Red oak has a change coefficient of .00369. We now have the data we need:
Change coefficient = .00369
Moisture content change = 3%
Board width = 127mm
The following calculation would apply: .00369 x 3 x 127= 1.4mm
In other words, for every 3-percentage-point increase in moisture content, a 127mm board will expand by more than 1.4mm. Over 10 boards, that will equal over 14mm of expansion — something the installer will need to take into account, although in actual practice the installation and fastening process will tend to restrain board movement somewhat.
APPENDIX D – TRAMMEL POINT METHOD
Trammel Points
Trammel points, which are used to scribe a circle or radius, consist of two points mounted on a beam – typically a piece of wood – and designed to slide along the beam to increase or decrease the radius.
Typically, one of the points is a pencil or pen, while the other is usually a metal point used to anchor the centre of the circle or the radius. The size of the radius can be adjusted by sliding the marking point along the beam to the desired length and locking it into position.
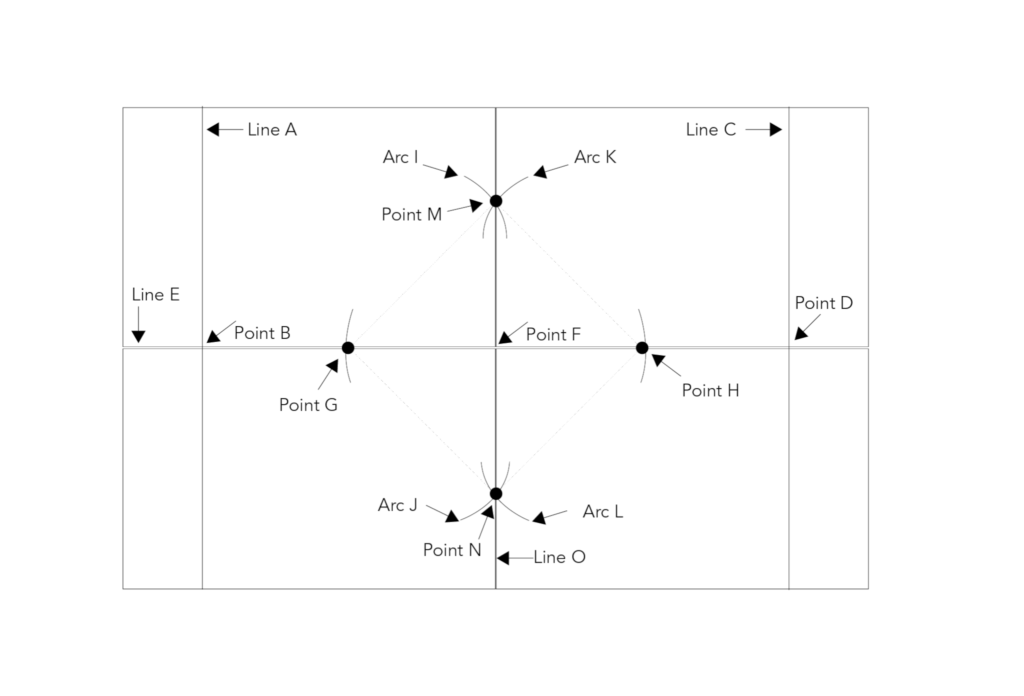
Trammel Point Method for Squaring a Room and Finding the Centre
- Measure the width of the room from top to bottom left of Centre (Line A).
- Find the Centre of Line A and mark it (Point B).
- Measure the width of the room from top to bottom right of Centre (Line C).
- Find the Centre of Line C and mark it (Point D).
- Adjust for any difference in Centre between Point B & Point D. For example, if Point B is one inch different than Point D, divide the difference by two to establish the new Centre point of Line A.
- Snap a line the length of the room from Point B through Point D. This is now Line E.
- Find the Centre point of Line E and mark it Point F.
- From Point F, use trammel point at fixed position on flat board to mark through Line E left of Centre, and mark it Point G.
- From Point F, use trammel point at the same fixed position on flat board to mark through Line E right of Centre, and mark it Point H.
- From Point G, use trammel point at a fixed position on flat board draw arc above Line E. Mark this Arc I.
- From Point G, use trammel point at the same fixed position on flat board draw arc below Line E. Mark this Arc J.
- From Point H, use trammel point at the same fixed position on flat board draw arc above Line E. Mark this Arc K.
- From point H, use trammel point at the same fixed position on flat board draw arc below Line E. Mark this Arc L.
- Where Arc I and Arc K intersect, mark it Point M.
- Where Arc J and Arc L intersect, mark it Point N.
- Snap a line from Point M through Point N, and mark it Line O.
- Where Line O intersects Line E is the Centre of the room. Line E and Line O also form a 90-degree angle.
APPENDIX E – SOUND CONTROL
Covered by Local Building Regulations, E sound.
When installing wood floors (hard surface flooring) in multi-family dwellings it is necessary to take into consideration the contents of the Sound Control Schedule E of your Local Building Regulations which may vary from region to region.
Installation
A basic key to peak performance is to avoid hard surface transference points. This would mean that the floor should not come in direct contact with the wall or any moulding such as skirting or architrave. A small gap should be left between the moulding and the floor as well as the floor and the wall.
Leaving a gap would prevent sound from traveling across the floor to the wall or moulding and down behind the wall where there is no sound control.
Nails are also considered a hard surface transference point. When installing a nail down wood floor nails should not penetrate through the floor and into the sound control material and sub floor below. Doing so would greatly diminish the performance of the sound control material.
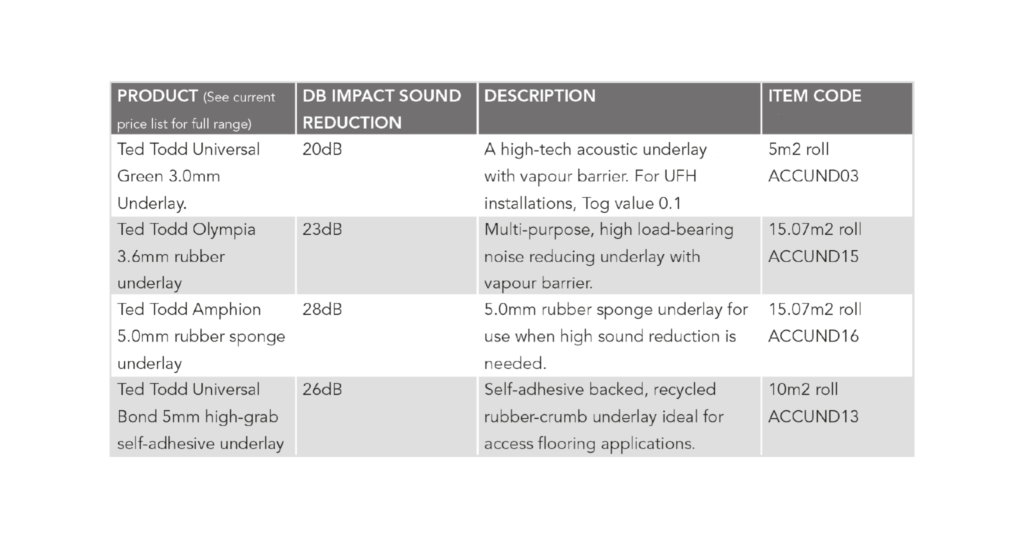
Sound Control Product Types
There are a wide variety of materials that are marketed for their noise control properties. Some are systems, and others are specific materials. Noise transfer from floor to ceiling is dependent upon the entire floor-ceiling assembly.
Variables, such as type of floor (i.e. wood or ceramic, laminate, marble), concrete thickness, with or without suspended ceiling, wood frame structure can greatly affect the sound control performance of the installation.
For wood floor installation in areas where sound control is important, always use Ted Todd underlays on floating floor installations.
The most effective sound reduction products are as follows:
APPENDIX F – MOULDINGS USED WITH HARDWOOD FLOORS
Wood floors require expansion space at the wall and all vertical obstructions. Mouldings are used to cover the expansion area, to hide cut ends, to adjust height differences or transitions between floors and to aesthetically finish the area.
REDUCER
Supplied for 15 and 20mm thick floors; used to make transition in thickness from wood floor down to thinner surface, generally through door openings.
T SECTION
Supplied for 15 and 20mm thick floors; used to make the transition at doorways, between interior rooms from one hard surface floor to another at equal heights.
L SECTION
Supplied for 15 and 20mm thick floors; used to cover expansion space in perimeter areas such as stone, brick wall and hearths as well as floor to ceiling glass and sliding doors, may also be used against existing door thresholds.
STAIR NOSING
Thickness is the same as the flooring and supplied in 15 and 20mm. This profile is used to create a finished edge on a top step, around stairwell or a sunken living room, etc.
SCOTIA
19 x 19mm profile, to be used to cover expansion space where skirting is in place and not being removed prior to installation of flooring.
PIPE FERRULE
16mm internal diameter pipe cover to conceal expansion space created around radiator pipes Oak profiles can be colour-matched to complement all of Ted Todd floors on request.
APPENDIX G – JOBSITE CHECKLIST
(Also see Chapter 1 – Jobsite Conditions in our full installation guide)
One primary rule will eliminate many potential problems caused by jobsite conditions: Wood flooring should be one of the last jobs completed on any construction project.
In particular, the jobsite should be enclosed and climate controlled before wood flooring is delivered or installed. In addition, other trades working on the jobsite can damage the wood flooring installation; so many problems can be minimized by limiting the amount of traffic at the jobsite after the wood flooring is installed.
Certainly, the jobsite should be carefully evaluated for potential problems before installation begins, but a thorough site evaluation should also be done even before wood flooring is delivered to the jobsite.
APPENDIX H – FORMALDEHYDE RELEASE
Some resins and coating used in the production process of wood flooring may contain formaldehyde. Where this is present these products have been produced and tested in accordance with British Standard BS EN 14342:2005 for solid wood flooring and BS EN 13986 for wood based panels and are class E1.